Embrace the joy of creativity this Easter by crafting your very own DIY Easter wreath with our step-by-step guide. This article will take you from gathering essential materials to adding the perfect finishing touches and personal flair. You’ll learn how to prepare a sturdy wreath base, incorporate classic Easter elements like eggs and bunnies, and enhance your creation with beautiful ribbons and blossoms. Whether you’re a seasoned crafter or a beginner, discover tips and techniques to create a stunning and unique decoration that reflects your personal style, perfectly ready to adorn your home this holiday season.
Key Takeaways
- Crafting a DIY Easter wreath allows for creative expression and provides a personalized touch to your holiday decor.
- Essential materials include a wreath base, greenery, Easter elements, and decorative features such as flowers and ribbons.
- Step-by-step instructions guide you through preparing your wreath base and adding greenery, ensuring a lush and appealing foundation.
- Incorporating Easter themes, such as eggs and bunnies, enhances the seasonal relevance of your wreath.
- Personalized touches and creative display strategies allow your wreath to reflect your unique style and holiday spirit.
Gathering Your Materials
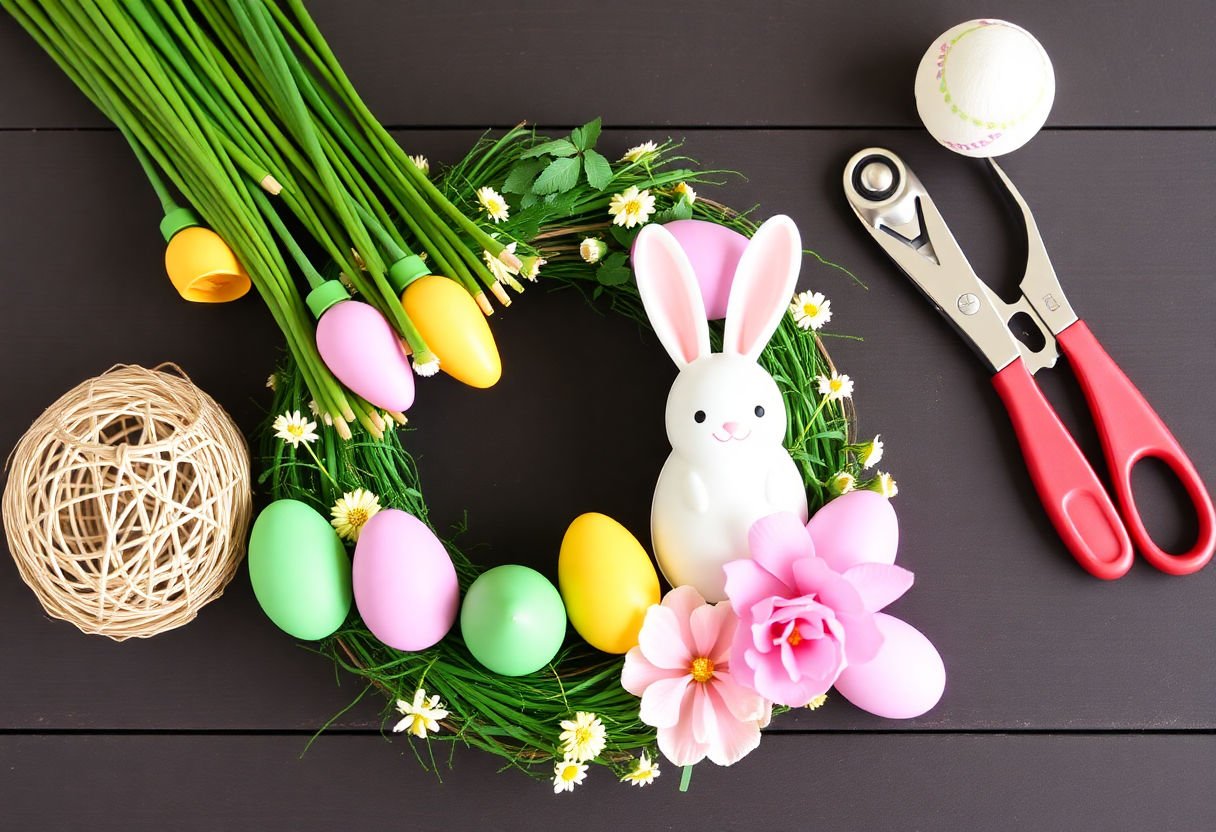
To embark on crafting the perfect DIY Easter wreath, gathering the right materials is pivotal. This process involves selecting both the fundamental components and decorative elements that reflect the beauty of Easter while allowing room for personal flair.
Essential Materials:
- Wreath Base: Opt for a robust base, such as a straw, foam, or grapevine wreath. The choice of material influences the overall look and ease of decorating. A grapevine base, for instance, offers a rustic aesthetic.
- Floral Wire: Necessary for securing various elements onto the wreath. Thin and flexible, it maintains its hold while remaining discreet.
- Hot Glue Gun: A vital tool for adhering decorations firmly in place. Its fast-setting nature ensures a swift assembly process.
Decorative Elements:
- Foliage and Greenery: Consider artificial ivy, ferns, or real evergreens to infuse your wreath with lush textures and vibrant color.
- Easter Symbols: Integrate colorful eggs, bunny figurines, or small wooden crosses to capture the essence of the holiday.
- Flowers: Choose an array of silk or preserved flowers, selecting hues that complement your existing decor.
Optional Adornments:
- Ribbons and Bows: A ribbon adds elegance and can serve as a focal point. Consider satin or grosgrain in soft pastels or bright spring colors.
- Personal Touches: Unique items such as family mementos or custom tags can add sentimental value and individuality to your wreath.
As you gather these materials, envision the final look of your Easter wreath, ensuring every component conjoins harmoniously to celebrate the season with grace and creativity.
Preparing Your Wreath Base
To commence your Easter wreath project, selecting and preparing the ideal wreath base is of paramount importance. The base serves as the foundation upon which all other elements will be anchored, and thus, careful consideration should be given to factors such as size, material, and desired style.
Start by determining the appropriate size for your wreath. This will largely depend on where you plan to display it—doors, walls, or centerpieces may require different dimensions. For a front door, a base measuring between 18 and 24 inches in diameter is typically effective, ensuring it is neither too overpowering nor understated.
The material of the wreath base significantly influences the overall look and longevity of your decoration. Common materials include:
- Grapevine: Offers a rustic charm and is sturdy enough to support heavier embellishments.
- Foam: Lightweight and versatile, it allows for easy insertion of decorative elements.
- Wire: Provides a minimalistic appearance, often used for wreaths that require precise shaping.
Consider the style and theme of your wreath when making your decision. Grapevine bases, for example, lend themselves well to country or vintage aesthetics, while wire or foam might suit more modern designs.
Upon selecting the base, ensure it is clean and free from any protruding materials that may interfere with the addition of decorative components. If necessary, gently sand any rough areas. It’s also advisable to reinforce delicate bases with additional wire or tape for added support, ensuring your masterpiece remains intact throughout the Easter season.
Adding Greenery and Foliage

Begin your wreath transformation by thoughtfully selecting and incorporating greenery and foliage. This step is pivotal in creating a lush and vibrant foundation, bringing life and color to your DIY creation.
Choosing the Right Greenery
Consider various types of greenery, ensuring they complement the overall theme of your wreath. Popular choices include:
- Eucalyptus leaves: Known for their soothing green hue and long-lasting freshness.
- Boxwood sprigs: Ideal for a full and symmetrical appearance.
- Ivy vines: Perfect for cascading or draping effects.
Preparing Your Greenery
Proper preparation of your greenery is essential. Trim the stems to an appropriate length, usually 4-6 inches, to make weaving and attaching easier. Remove excess leaves from the bottom of each stem; this will facilitate a cleaner look and more secure attachment.
Arrangement Techniques
Strategic arrangement is crucial. Start by positioning the greenery at equal intervals along the wreath base, ensuring even coverage. Affix each piece with sturdy floral wire or a hot glue gun. Layer the foliage to create depth and texture, overlapping pieces to cover the base entirely.
Maintaining Freshness
If using fresh foliage, maintain its vibrance by misting it lightly with water. This practice helps preserve color and prevent premature wilting. Alternatively, opt for high-quality artificial greenery, which offers lasting appeal without the need for maintenance.
By selecting and arranging your greenery with care, you lay a beautiful groundwork that enhances every subsequent decorative element, ensuring your Easter wreath remains a striking, festive centerpiece.
Incorporating Easter Elements
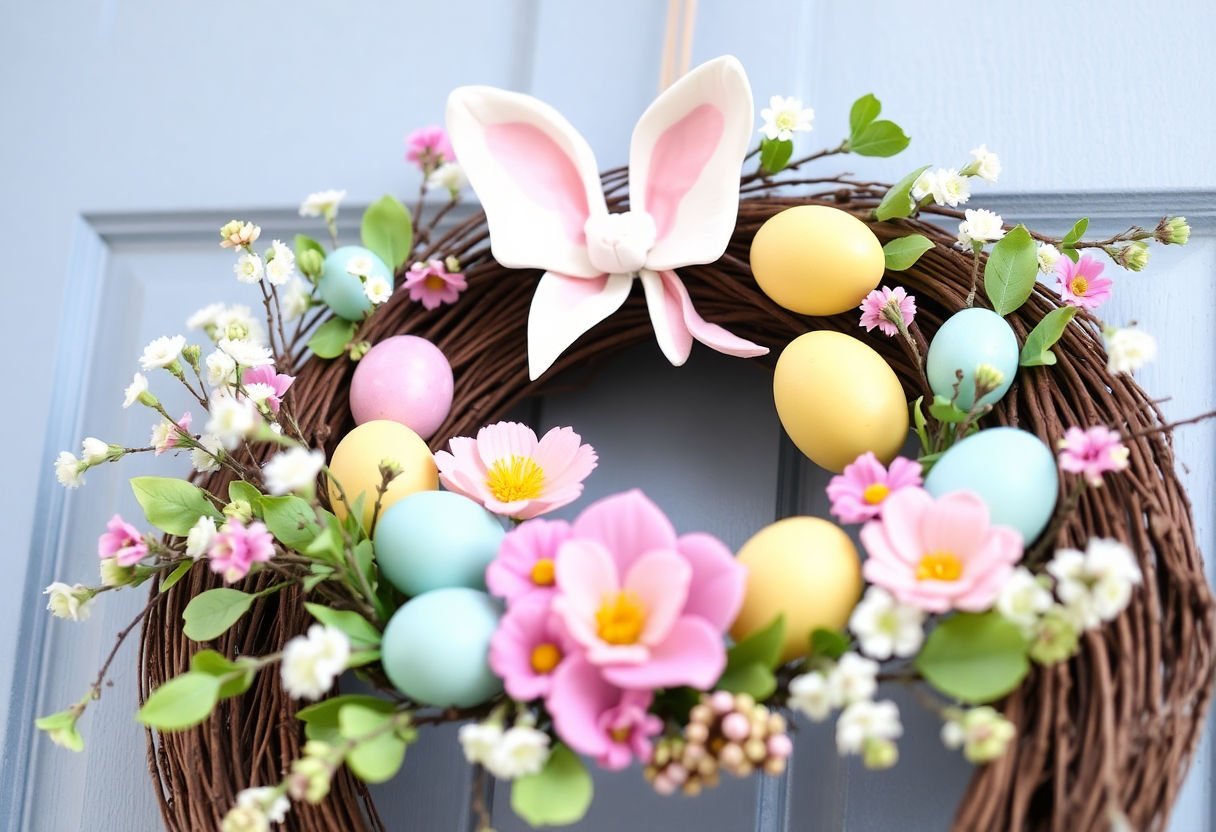
Incorporating Easter elements into your DIY wreath serves to elevate its seasonal appeal and reflect the festive spirit. By thoughtfully adding iconic symbols such as eggs, bunnies, and crosses, you can create a vibrant display that is both traditional and personal.
-
Decorative Eggs: Perhaps the most quintessential symbol of Easter, eggs can be used in a variety of ways. Consider using faux eggs of different sizes and colors, painted in pastel hues or adorned with glitter. You can secure them to your wreath using a strong adhesive or by threading them onto a wire.
-
Bunnies: These charming creatures add a playful touch to your decoration. Look for small wooden or plush bunny figures that can be nestled among the greenery. Miniature bunnies made from felt or fabric provide a softer, whimsical look.
-
Crosses: For a more solemn Easter representation, incorporating crosses can add a meaningful and spiritual layer to your wreath. Wooden or metal crosses offer an elegant touch, while decorated paper crosses can infuse more color and texture.
While arranging these elements, balance is key. Avoid overcrowding your wreath, as this might detract from its overall elegance. Instead, strive for harmony by spacing elements evenly and integrating them with the existing greenery and foliage. This approach not only highlights each Easter symbol but also ensures that your wreath maintains its cohesive design.
By embracing these classic Easter elements, your wreath becomes a testament to the season’s traditions, offering any guest a warm, festive welcome.
Choosing and Attaching Flowers
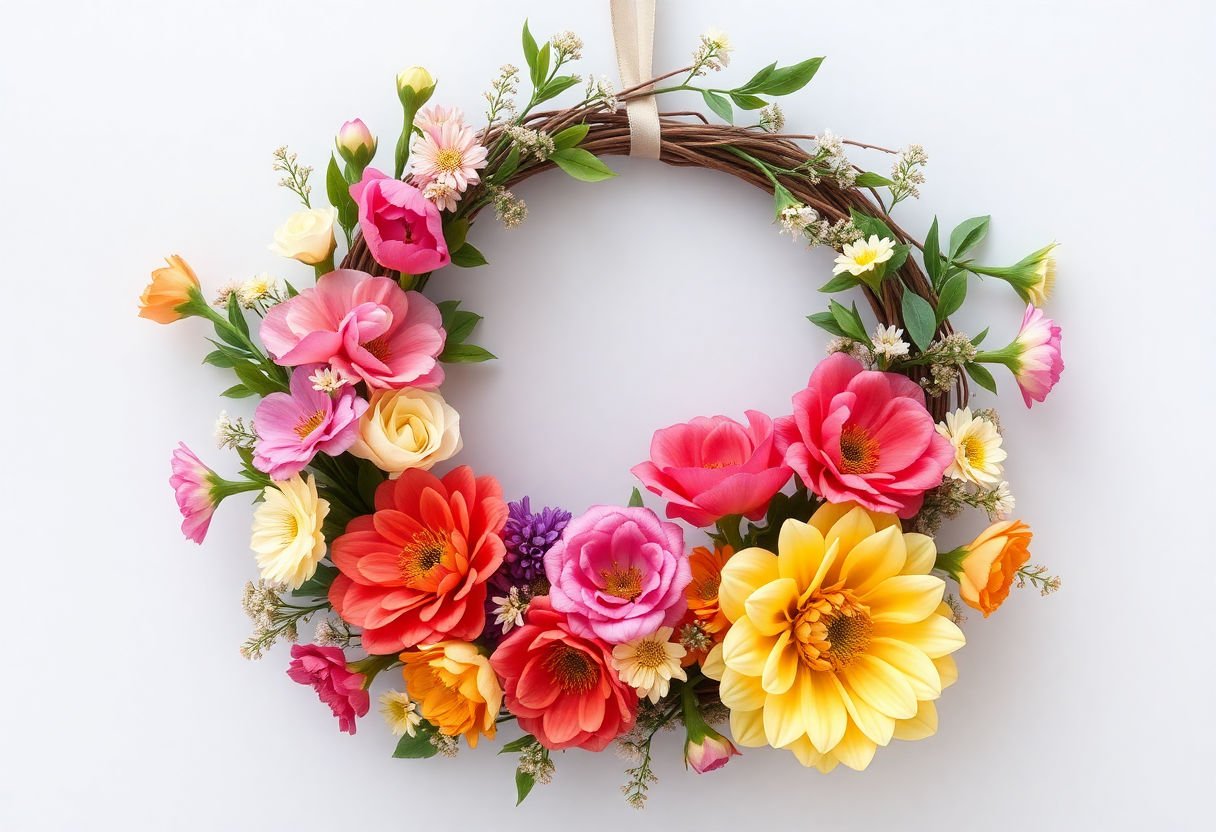
Selecting the right flowers for your Easter wreath is crucial to achieving a harmonious design. Start by considering the color palette of your wreath. Pastel shades, such as soft pinks, light blues, and yellows, are quintessential for Easter, evoking the gentle onset of spring. If you prefer a bolder look, incorporate bright colors to make a striking statement.
When choosing flowers, think of symbolism and aesthetic. Daffodils and tulips are traditional choices, symbolizing renewal and spring. For a touch of elegance, consider white lilies, signifying purity and hope. You could also integrate artificial flowers for longevity and maintenance-free beauty.
To attach the flowers securely, gather tools such as floral wire, hot glue, or zip ties. Start by arranging your flowers on the wreath base without securing them to visualize your design. Once satisfied with the arrangement, attach each flower.
- Floral Wire: For fresh flowers or those with stems, gently wrap floral wire around the stem and weave or attach it to the wreath base.
- Hot Glue: A practical option for artificial flowers, hot glue provides a firm hold. Apply a dab of glue to the base of the flower and press it onto your wreath.
- Zip Ties: These are excellent for securing bulkier flowers or when working with heavier materials.
While securing your flowers, step back periodically to view the overall look and ensure a balanced distribution of colors and shapes.
Adding Ribbons and Bows

Adding ribbons and bows to your DIY Easter wreath is a brilliant way to infuse it with charm and personality. These elements serve as both an aesthetic enhancement and a testament to your craftsmanship.
When selecting ribbons, consider materials and colors that align with the overall theme of your wreath. Satin and organza are popular choices due to their sheen and flexibility, which create a delicate, finished look. Pastel shades such as soft pinks, blues, and yellows are particularly suitable for an Easter wreath as they evoke the gentle hues of spring.
Here’s how to create and attach decorative ribbons and bows effectively:
-
Choose the Ribbon Width and Length: For a balanced appearance, use ribbons that are between 1 to 2 inches in width. Cut strips of varying lengths to add depth and interest.
-
Create Bows: To make a simple bow, loop the ribbon and tie it in the center. For a more elaborate look, consider layering multiple ribbons or adding tails that drape from the bow.
-
Attaching the Bows: Use floral wire or a hot glue gun to securely attach the bows to the wreath. Place them strategically to cover joins of foliage or to balance the composition.
-
Consider Adding Streamers: Enhance the vibrancy by incorporating streamers, allowing them to cascade to add movement to your design.
By thoughtfully integrating ribbons and bows, your Easter wreath will not only capture the spirit of the season but also showcase your creative flair.
Personalizing Your Wreath
Transforming your Easter wreath into a personal masterpiece involves infusing it with elements that reflect your style and the spirit of your household. Here are several innovative ways to make your wreath truly unique:
-
Add Family Heirlooms: Incorporating small family keepsakes or heirlooms can add sentimental value to your wreath. Consider using items like vintage brooches or small trinkets that hold special meaning.
-
Monograms and Initials: Attach wooden or metal letters representing your family’s initials. This can serve as a charming focal point and enhance your home’s welcoming aura.
-
Thematic Colors and Patterns: Use ribbons, fabrics, or paint in colors and patterns that are meaningful to your family. Whether it’s pastels, vibrant hues, or specific patterns like stripes or polka dots, these choices can accentuate the overall festive look.
-
Personal Photos: Secure small, weather-proof frames with cherished family photos around the wreath. This personal touch not only customizes your decoration but also serves as a delightful talking point for guests.
-
Crafted Elements: If you enjoy crafting, add handmade components such as felt flowers, crocheted items, or even paper origami. These elements can emphasize your crafty personality and make the wreath distinctively yours.
In the words of a seasoned wreath maker, “Adding personal touches to your wreath not only enhances its beauty but also creates a connection between you and your creation.” By employing these ideas, you can ensure your DIY Easter wreath is a reflection of your family’s unique story.
Finishing Touches and Display Tips
Once you have added all the decorative elements to your Easter wreath, it is crucial to focus on those final finishing touches that will elevate its overall appearance. Consider using a light mist of spray adhesive to secure any loose items or foliage. This ensures durability, allowing your wreath to maintain its beauty throughout the Easter season.
Evaluate the arrangement from different angles, adjusting where necessary to create a balanced composition. You might want to incorporate subtle accents such as tiny blossoms or small Easter-themed trinkets, affording your overall design a cohesive and polished look.
When it comes to displaying your completed wreath, choosing the right location can significantly impact its visual appeal. Here are a few tips to achieve an attractive display:
-
Contrasting Background: Hang your wreath against a backdrop that contrasts with its colors. A soft-colored door will accentuate vibrant hues, while darker backgrounds complement pastels.
-
Optimal Height: Display the wreath at eye level for maximum impact. This typically means positioning it between 57 and 60 inches from the floor.
-
Using Appropriate Hangings: Utilize a sturdy wreath hanger or an adhesive hook specifically designed for outdoor use. If placing indoors, consider a stylish ribbon to elegantly suspend the wreath.
-
Protect from Elements: If situating your wreath outdoors, ensure that it is sheltered from direct energy sources like intense sunlight or rain, which could cause fading or deterioration.
By following these finishing touches and display tips, your DIY Easter wreath will not only look exquisite but also stand up to the test of time, becoming a cherished part of your festive decor.
Conclusion
Crafting a DIY Easter wreath not only allows for personal expression but also adds a festive touch to your home. By gathering the essential materials and following each detailed step, from preparing the wreath base to adding personalized touches, you create a unique piece that embodies the spirit of the season. As you display your finished wreath, be encouraged to embrace creativity and let your wreath-making journey inspire future DIY projects. This hands-on approach not only enhances your artistic skills but also fosters a deeper appreciation for personalized, handcrafted decor.
Frequently Asked Questions
What materials do I need to start crafting a DIY Easter wreath?
To begin crafting your DIY Easter wreath, you will need a wreath base, greenery such as faux or fresh foliage, Easter-themed decorations like eggs and ribbons, and suitable adhesive or wire to secure all elements. Personal touches can be added based on personal preference.
How can I make sure my wreath lasts throughout the Easter season?
To ensure your wreath lasts, consider using artificial elements, especially if displayed outdoors. For fresh materials, mist them lightly to maintain moisture and keep the wreath out of direct sunlight to prevent fading.
Is it possible to customize the design of my Easter wreath?
Absolutely, personalizing your wreath is a creative aspect of the project. Consider incorporating unique ornaments, mirrors, or custom-colored eggs to reflect your personal style or coordinate with your home decor.
Are there recommended flower types for an Easter wreath?
Spring flowers like daffodils, tulips, and hyacinths are excellent choices for an Easter wreath, as they represent new beginnings and add a vibrant touch. Choose colors that complement your overall design without overwhelming it.
What is the best way to display my completed Easter wreath?
Hang your completed Easter wreath on a sturdy door hanger to ensure it stays secure. For outdoor display, select a location sheltered from harsh weather to maintain its condition and visual appeal throughout the holiday season.