Halloween stirs excitement with its eerie charm. Bring creativity and fun to the season with simple DIY crafts perfect for everyone. From painting pumpkins to crafting spooky silhouettes, these activities transform homes into festive wonderlands. Imagine glowing Mason jar lanterns or playful ghost garlands lining your halls. Create monster hats that add joy to any party. Make intricate paper spider webs for an extra fright. Each craft invites you to explore your creativity while celebrating the holiday spirit. Dive into these exciting Halloween crafts that promise memories and laughs for all ages.
Key Takeaways
- Discover simple, spooky DIY crafts for everyone, perfect for adding a festive touch to Halloween.
- Engage with family or friends over budget-friendly projects that require only basic materials.
- Enhance your decorations with creative ideas like pumpkin painting and paper spider webs.
- Create lasting memories with mystical mask-making and monster party hats.
- Experience the joy of crafting while boosting creativity and holiday spirit.
Pumpkin Painting Fun

Painting pumpkins adds Halloween spirit to any home without the need for carving. Pick up some paints and gather pumpkins of various sizes and shapes. You do not need to limit yourself to orange pumpkins. Use white, green, or any other color you find. The more variety, the better!
Fun Painting Ideas
- Spooky Faces: Paint on eerie eyes, a wide grin, or jagged teeth. Add some red paint for a blood-like effect.
- Friendly Monsters: Use bright colors like green or purple. Add googly eyes or pipe cleaners as arms or horns.
- Stripes and Polka Dots: These are simple yet striking. Create patterns that grab attention.
- Nature-Inspired Patterns: Try leaves, vines, or flowers for a more nature-driven look.
Materials You Need
- Acrylic Paint: These dry fast and have vibrant colors.
- Paintbrushes: Use different sizes for details.
- Painter’s Tape: Helps create straight lines or patterns.
- Sealer Spray: Protects your art from rain or moisture.
- Extras: Try adding stickers, glitter, or pom-poms.
Tips for the Best Results
- Use a damp cloth to clean the pumpkin before you start. This helps the paint stick better.
- Sketch your design lightly with a pencil first.
- Let the first layer dry before adding details.
Remember to enjoy the process. Invite friends or family to join in the fun. Make it a festive gathering where everyone can share their unique creations. Happy painting!
Spooky Window Silhouettes
Spooky Window Silhouettes
Creating spooky window silhouettes brings Halloween to life. They are easy to make and can turn a simple window into a scene from a Halloween story.
What You Need:
- Black construction paper or cardboard
- Scissors
- Tape
- A pencil
- A white or yellow light
How to Create:
-
Choose Your Silhouette: Classic designs like witches, bats, black cats, and pumpkins work great. Draw these on the construction paper.
-
Cut Out Carefully: Use scissors to cut out the shape. Take your time. This part needs patience to get the details right.
-
Attach to the Window: Use tape to secure the silhouette to the window. Place it so it faces outside.
-
Add Light from Behind: Put a white or yellow light behind the silhouette. This will make it stand out, especially at night.
Tips for Success:
- Size Matters: Bigger silhouettes are usually better. They are easier to see from a distance.
- Get Creative: Add accessories. For example, a witch can have a broom or a hat.
Variations to Try:
- Layer different shapes for a more complex look.
- Place battery lights on windowsills to intensify the effect.
Using spooky silhouettes will make your house the talk of the neighborhood. They are fun, cheap, and bring the Halloween spirit right to your window!
Mason Jar Lanterns
Mason jar lanterns bring a warm glow to Halloween nights. They are simple. You do not need much to start. A few jars, some twine, and a bit of paint.
Materials Needed:
- Mason jars
- Acrylic paint or glass paint
- Paintbrushes
- Battery-operated tealights
- Twine or ribbon
- Small stickers or stencils
Steps to Create:
-
Prepare the Jars: Clean the jars so they are free of dust and grease. Paint sticks better to clean surfaces.
-
Plan Your Design: Use stencils for shapes like bats, pumpkins, or ghosts. Stick these onto the jars. Paint around them to get clear shapes.
-
Painting Time: Paint the jars in spooky colors. Black for bats, orange for pumpkins, white for ghosts. You can mix it up. Make sure the paint is even.
-
Add the Light: Once dry, place a tealight inside each jar. These lights are safe and make the jars glow softly.
-
Decorate: Tie twine around the top of the jars. Make sure it’s snug. It gives a rustic look and helps to hang them if needed.
These lanterns look amazing on porches or window sills. With just a few materials, you create something magical. Each jar is a small patch of light in the dark night. A little twist of creativity, perfect for Halloween!
DIY Ghost Garlands
Creating a ghost garland is a simple craft that adds a playful touch to Halloween decorations. Even kids can help!
What You Need:
- White tissues or cheesecloth
- Cotton balls or small Styrofoam balls
- Black marker
- String or yarn
- Scissors
Steps to Follow:
-
Create the Ghosts: Place a cotton ball at the center of a tissue or cheesecloth. Wrap it around to form a ghost shape. Tie a piece of yarn under the “head” to secure it.
-
Add the Face: Use a marker to draw ghostly eyes and a mouth. Kids love drawing funny or scary faces.
-
Assemble the Garland: Cut a long piece of string. Attach each ghost by tying them along the string, spacing them apart evenly.
Hang your ghost garland on a wall or across a porch. These friendly phantoms will swing in the breeze, making your Halloween both spooky and delightful.
Kids and adults alike find the process enjoyable. This craft fits any skill level and uses materials found around most homes. What’s more inviting than a row of happy little ghosts greeting trick-or-treaters as they arrive? It’s fun and adds a touch of homemade charm to your decorations.
Monster Party Hats
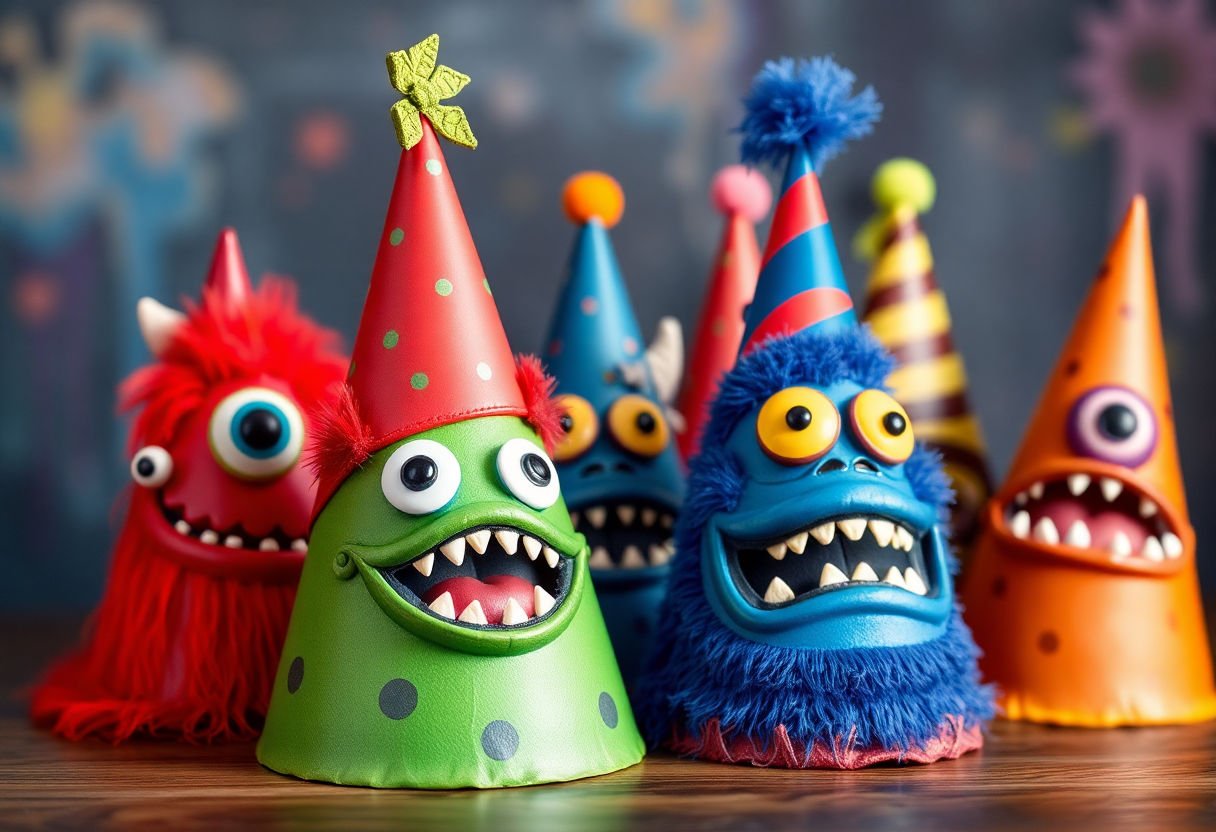
Creating monster-themed party hats offers a fun way to add excitement to any Halloween gathering. These hats are easy to make and allow for lots of creativity. Kids and adults can enjoy making these spooky accessories together. Here’s how you can craft your monster hats with simple materials.
Materials You’ll Need:
- Colored construction paper
- Glue stick or tape
- Scissors
- Markers or crayons
- Googly eyes
- Pom-poms or pipe cleaners
Steps to Make Monster Hats:
-
Base Hat: Start by creating a cone from a piece of construction paper. Roll the paper into a cone shape. Secure it with glue or tape. Trim the base so it can sit flat.
-
Monster Features: Now, it’s time to add the monster’s character. Cut out different shapes for mouths, noses, and teeth. Use markers to draw details like scales or scars.
-
Add Personality: Stick the googly eyes onto your hat. Use pipe cleaners or pom-poms for antennas or hair. Don’t be afraid to mix colors and shapes. Each monster can have its own look.
-
Finishing Touches: Once you’ve created your monster faces, affix them to the hats. Add extra decorations like glitter or stickers if you’d like.
These monster party hats make a great craft activity. After all, Halloween is a time for imaginations to run wild! Your guests will love wearing their own unique creation. It’s a delightful way to celebrate the spooky season.
Paper Spider Webs
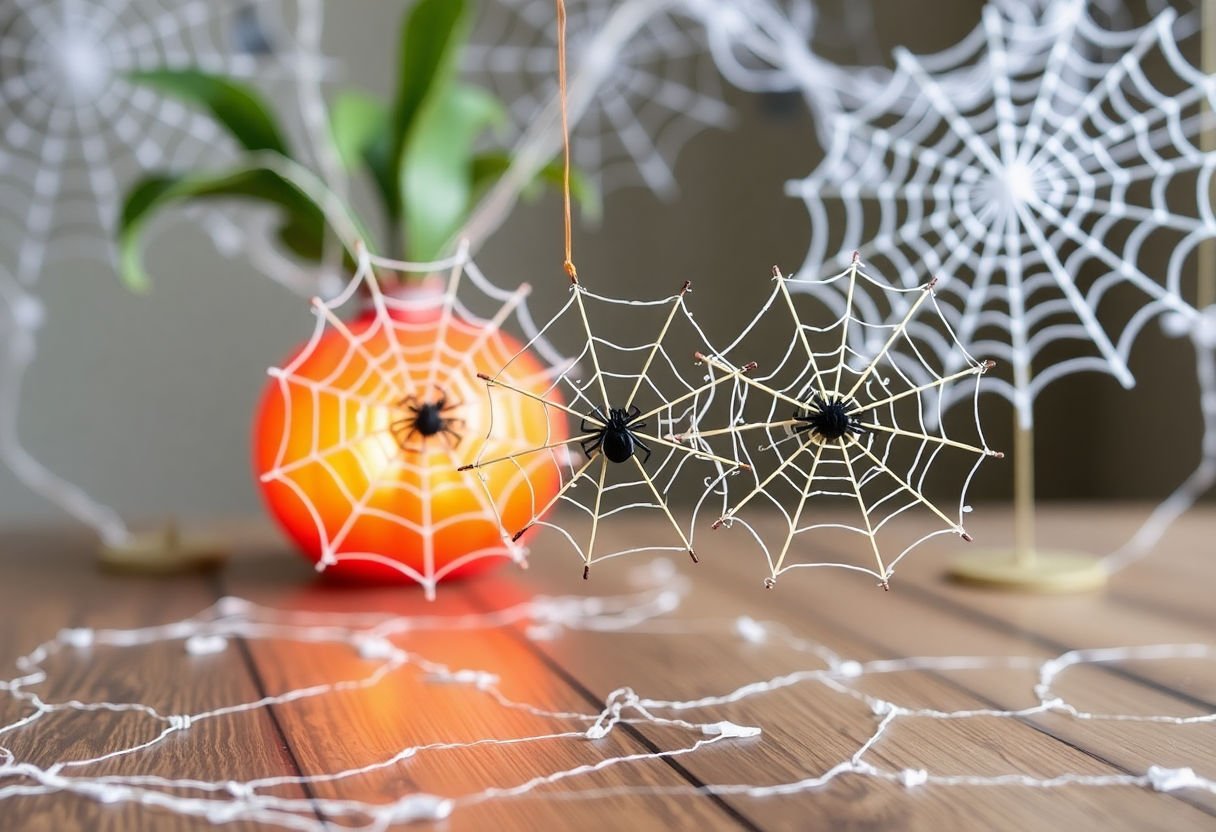
Making paper spider webs can be a lot of fun and a great way to get into the Halloween spirit. These webs look spooky and can hang anywhere in your home. You don’t need many supplies, and the steps are easy to follow.
Materials Needed:
- Black construction paper
- Scissors
- White chalk or pencil
- String or tape
Start with a square piece of black paper. Fold it diagonally to form a triangle. Fold it again once more in the same direction. Now, you have a smaller triangle. Take the shorter side and fold it to meet the longer side. The paper should now look like a cone.
Next, use your white chalk to draw a curved line from the top to the bottom. This will be where you cut. Draw more lines across the paper, creating sections like those of a pie. Cut out small triangles along these lines to create openings in your web.
Unfold the paper gently. You will now see your spider web. It might look delicate, but it holds its shape well if handled carefully. To add a spider, cut a small shape from leftover paper and stick it to the web.
To display your creations, attach a string or use some tape. Hang them in a window or against a wall for a spooky effect. These paper spider webs are simple but they create a fun and eerie atmosphere for Halloween.
Frankenstein Bookmarks
Create Frankenstein bookmarks to add a fun, spooky touch to reading time. It’s an easy project for kids and adults.
Materials Needed:
- Green and black cardstock
- Black yarn or thread
- Glue stick
- Scissors
- Permanent marker
Instructions:
-
Start by cutting rectangles from the green cardstock. Each piece should be about 2 inches wide and 6 inches tall. This will be Frankenstein’s face.
-
Next, cut small rectangles from the black cardstock for hair. Use scissors to make a zigzag pattern on one side. Glue it to the top of the green rectangle.
-
Draw the face. Use the marker to add eyes, a nose, and a mouth. Make the face as scary or funny as you want.
-
Add the bolts. Cut two small rectangles from the black cardstock. Glue one on each side of the green rectangle. These are Frankenstein’s neck bolts!
-
Tie yarn for a finishing touch. Cut a piece of black yarn and tie it around the bookmark. It adds an extra spooky element.
These bookmarks are perfect for keeping your place in school books or favorite stories. They are easy to make and fun to use. Plus, they can double as cool gifts for friends during Halloween. Enjoy making your own Frankenstein creation!
Creepy Crawly Wreaths

Decorating your door with a creepy crawly wreath can impress guests this Halloween. This spooky wreath welcomes both young and old. It sets the mood and shows that spooky fun starts at the door.
Materials Needed:
- A plain wreath base (grapevine or foam)
- Fake spiders and insects
- Black and orange ribbon
- Glue gun
- Scissors
Start with your wreath base. A grapevine wreath adds a natural twist, while a foam one gives a solid look. Wrap black and orange ribbon around it. Tying the colors together makes the wreath pop.
Now, bring out the creepy crawlers. Arrange your fake spiders and insects on the wreath. Use a glue gun to secure them. Remember, more creepy crawlies add more spook.
Let the glue dry. Hanging the wreath on your door is the final step. Choose a sturdy hook. Safety first when attaching it.
This craft is a fun way to jump-start the season. Quick to make and full of Halloween charm. It transforms your entrance into a spooky greeting. Perfect for the trick-or-treaters and Halloween fans alike.
Mystical Mask Making

Creating mystical Halloween masks can add a magical and eerie touch to your celebration. These masks not only make costumes pop but also let creativity shine. Get ready for some mask magic with this simple guide.
First, gather materials. You will need:
- Blank masks or sturdy paper plates
- Paint in multiple colors
- Paintbrushes
- Glue
- Glitter
- Feathers
- Ribbons
- Sequins
Start by choosing a character or theme. Imagine a mysterious forest creature or a haunting phantom. Let the theme guide your color choices and decorations.
Begin painting the mask with vibrant colors. Let dry. Use paint to draw features like eyes and mouth. Try bold colors, swirling patterns, or intricate designs. Feel free to get creative!
Attach feathers or ribbons using glue. They can enhance the look by adding extra flair. Layering different textures gives the mask depth. Next, sprinkle glitter for a mystical sparkle. Just be sure to let the glue dry first.
Add sequins for that final touch of magic. Place them around the eyes or mouth to highlight features. Have fun with placement and think outside the box.
These masks invite imaginative play and curiosity. Remember to explore different styles and inspirations. From witches to wizards, these masks let imaginations roam free. With unique designs, everyone gets a chance to stand out this Halloween. Whether for kids or adults, mystical masks promise fun and wonder. Happy mask-making!
Conclusion
Creating spooky and simple Halloween crafts together makes this holiday special. Each project—from painting pumpkins to making mystical masks—offers fun ways to spark creativity. These activities suit all ages, turning ordinary materials into exciting decorations. As you explore these crafts, remember that the joy comes from the process of making. So gather your supplies, invite friends and family, and let your imagination run wild. Keep crafting and discover how small efforts can make Halloween more memorable and fun for everyone involved.
Frequently Asked Questions
What materials do I need for these Halloween crafts?
You need basic craft supplies like paint, scissors, construction paper, Mason jars, and glue. Some crafts may require items like twine or fabric. Check each project for specific materials.
Can kids do these crafts on their own?
Yes, most crafts are kid-friendly. Supervise younger children, especially when using scissors or glue. The instructions are simple so older kids can enjoy crafting independently.
How can I make these crafts more environmentally friendly?
Use recycled materials like old newspapers or jars. Opt for non-toxic paints and glues. Encourage using items you already have at home to reduce waste.
How long does each craft take?
Most crafts take between 30 minutes to an hour. Time can vary based on the complexity and your pace. Always allow extra time for paint or glue to dry.
How can I personalize these crafts?
Personalize by choosing favorite colors and themes. Add unique touches like glitter or stickers. Let each person’s creativity shine to make every craft unique.